
Wednesday, June 20, 2007

WIP Update

So, I've been surprisingly faithful to one project since last week's WIP Wednesday post. In fact, other than swatching for the Mystery Stole 3 KAL (more on that in a minute), I've only worked on my Molly Weasley Sleeves.

Last week, I showed you this picture, but like I said then, that wasn't an accurate depiction of where I was on the project. This is a little more accurate picture of where I was:
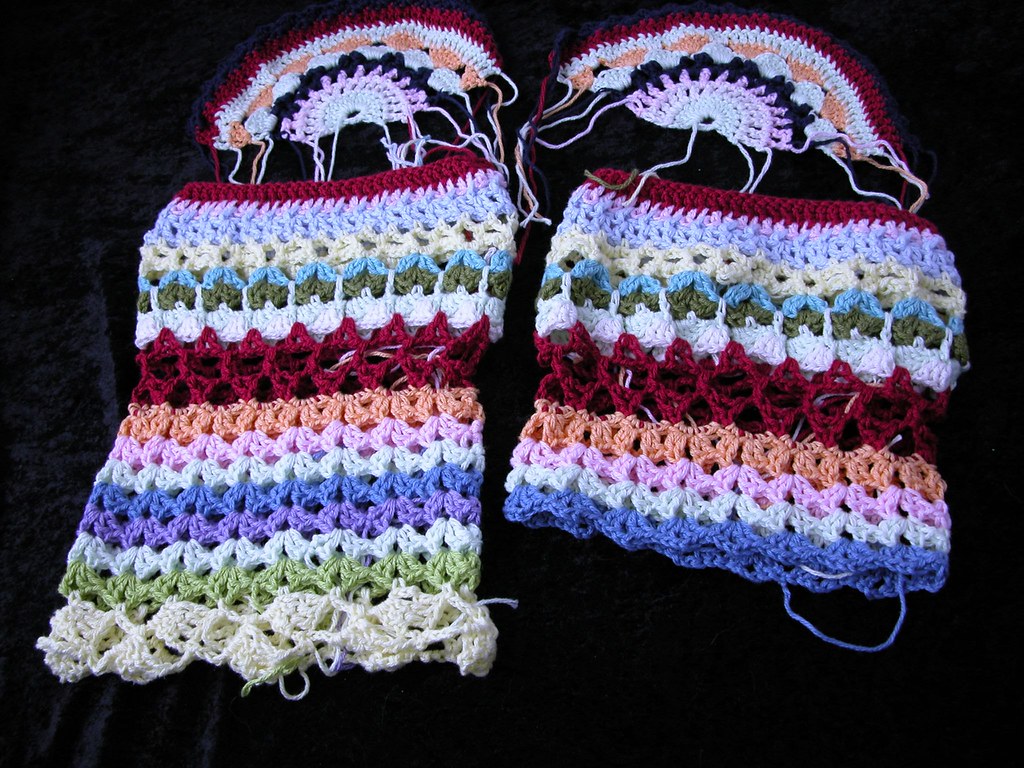
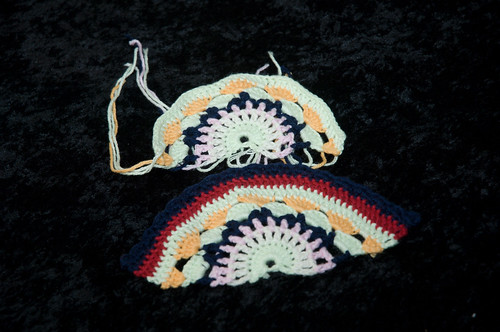
Since then, I've gotten to here: (And yes, I know this is a crap picture. I'm babysitting, and therefore can't really get everything up to Kris's studio with the good lighting.)
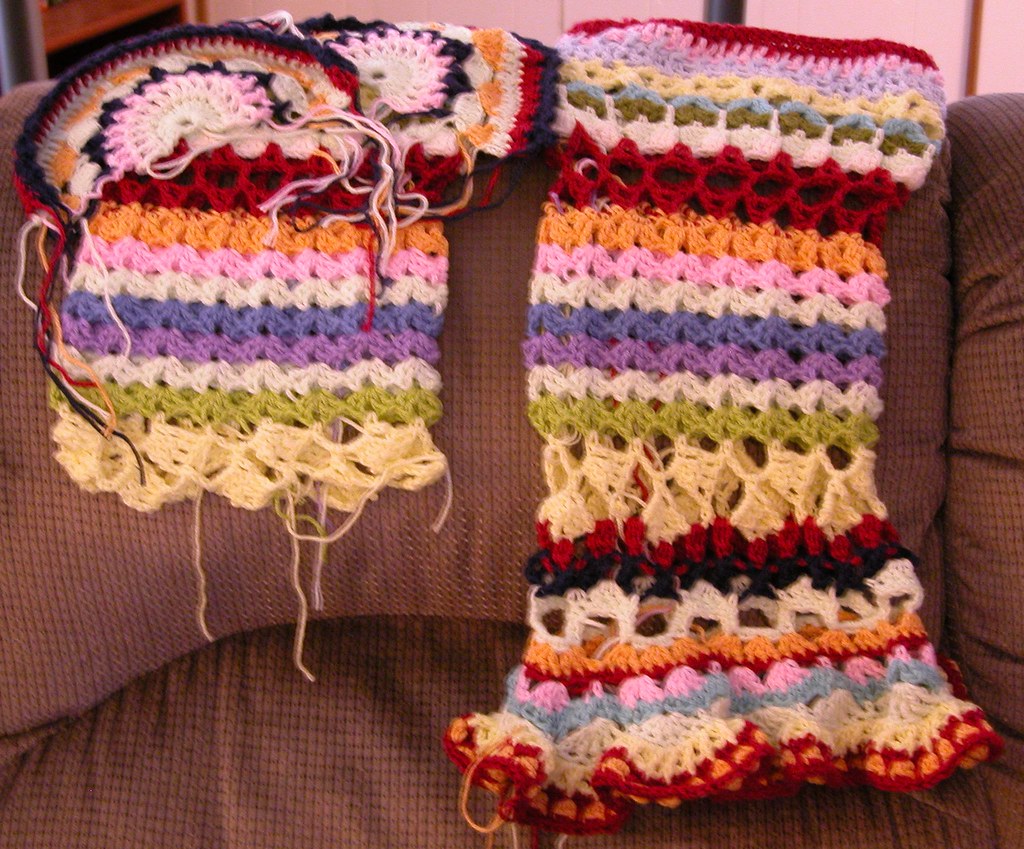
I'm hoping that I will be able to finish this up sometime this weekend. I have 4 more rounds left to finish the sleeve on the right, there, and then I need to catch the other one up and finish it. Once that is done, I have to weave in the ends, and voila! On the recommendation of some of my knitting group buddies, I found a denim jacket at Old Navy's website, and I'll be attaching the sleeves to that instead of a sweater. I think they will look really cute with the denim.

And the Mystery Stole - thank you all for your input and opinions. Most of you agreed with my feelings, which was that the Charcoal (which I had labeled as "Steel" in the pictures... *sigh*) was the better color. The bead opinion was pretty split, and I wasn't sure which I liked better, either, so I swatched:
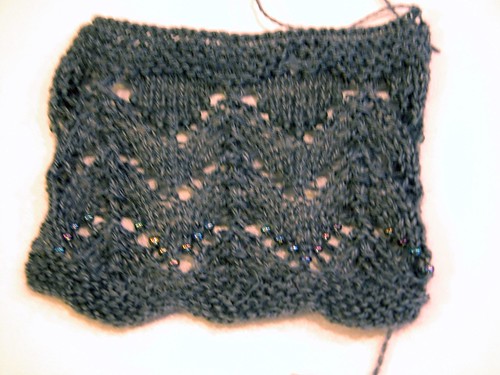
The bottom repeat has the #901 beads, the middle repeat is without beads, and the top has the #912 beads. You don't see them? Yeah, me either. It looks like they matched the yarn color a little TOO well. Bummer, because I really liked them. That's ok, though - I like the way that the #901's look. And I like the fabric I got on the US3's, so it looks like all I need to do now is wait until the first clue comes out! Think I can get the sleeves done by then? Here's hoping!

ETA: And I completely forgot that I wanted to mention this! I saw on Annie Modesitt's blog (while looking for something else) that her husband Gerry has been diagnosed with multiple myeloma, which completely sucks, to be blunt about it. She has a pattern posted for the "Red Carpet Convertible", and she is using the sale of that pattern to help offset some of the expenses of Gerry's treatment. (If you remember the stories of the knitted Emmy dress last year, this is that pattern). So, if you have a couple of bucks, why not pop over there, pick up a gorgeous pattern, and help a knitter who is in a cruddy situation.

Labels: , , , , ,

Friday, June 02, 2006

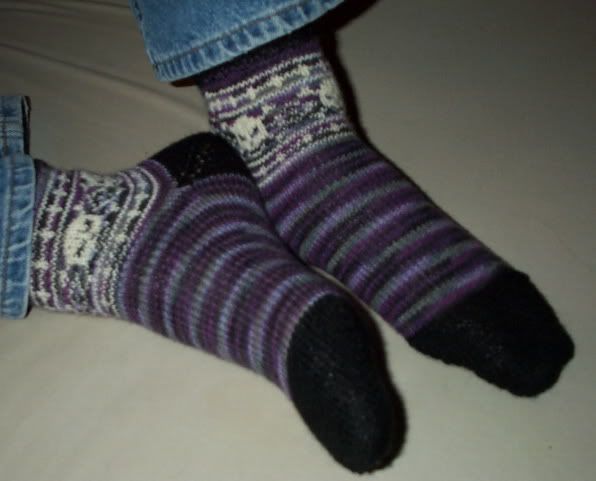
Jack Sparrow's Favorite Socks

Okay, so maybe I'm taking some liberties with assuming they would be his favorite socks. Kind of tempting to make some and mail them to Johnny Depp and Orlando Bloom, though, just to see how grateful they would be for fabulous handknit socks...

Where was I? Oh yeah, the Pirate Socks:

Materials:
MC - Lorna's Laces Shepherd Sock in Black Purl - 2 skeins
CC1 - Knit Picks Essential in Black - less than 1 skein
CC2 - Patons Kroy Sock in Muslin - less than 1 skein

Size US2 needles (or size needed for gauge)- I use the 2-circ method, but if you prefer DPNs or Magic Loop, go for it!
Size C crochet hook
Waste yarn for provisional cast-on

Gauge: 28sts=4" in Stockinette stitch

Short-row Toe:
Using crochet hook and waste yarn, cast 32 stitches onto needle. Change to MC and knit across all stitches. Then, following the great Short-Row Toe instructions here, work short rows until you have 8 live stitches in the middle, and 12 wrapped stitches on either side. At this point, go on to the "Now work the second half of the toe" section of the instructions until your toe is complete.

Foot:
Once you have the toe complete and have placed your provisional cast-on back on your needles, work one round with CC1, and then switch to the MC. Work in the MC in stockinette until the sock is about 2" shorter then the intended wearer's foot.

Heel:
Change to CC1 again, and work the short-row heel exactly the same way you worked the toe, leaving the instep stitches on a holder or another needle.

Cuff:
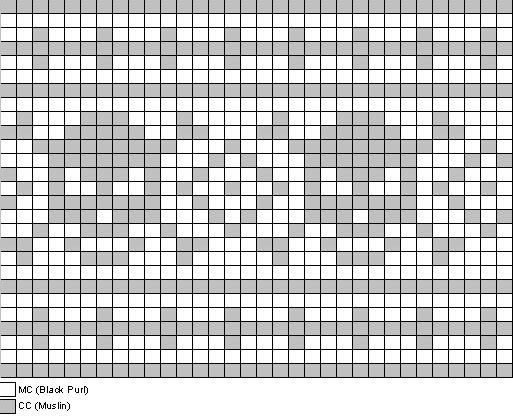
Once the heel is complete, change back to the MC and work 5 rounds in stockinette. Join CC2 and work the pirate motif chart. Be sure to keep the floats nice and loose so that the cuff will stretch over a heel. The entire chart will repeat twice around the top of the sock. Once the chart is complete, work another 5 rounds in stockinette in the MC. Change to CC1 and work 5 rounds of K2P2 rib. Bind off loosely. (I like EZ's sewn bind off, personally. Loose, but not sloppy.)

Repeat for second sock, unless you are like me and do both at once. Now, go sail the high seas and plunder a village or two!

Pirate motif chart: (Adapted from the "We Call Them Pirates" hat pattern at helloyarn.com)

ETA: Wow. I was checking my stats, and apparently this is now linked from Knitting Pattern Central. So, if that's how you found it, HI! And if you make them, please come back and leave a comment with a link to pictures - I'd love to see them!

ETA Again - The sidebar has been updated with .pdf versions of my patterns - easier to print!

Labels:

Thursday, February 09, 2006

Jessica - A Felted Purse Pattern

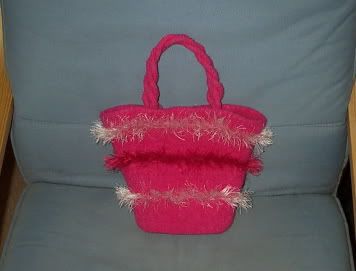
Jessica - A Felted Purse

My hairstylist is very big on pink (She had pink streaks in her hair when I first met her). She saw one of the felted bags I had made for myself and jokingly asked me to make one for her. I decided to design a little fluffy bag for her as a Christmas gift. It is, of course, very, very pink.

Also, big, big thanks to Stitchcounter for test-knitting this pattern for me!


Size: One
Finished Measurements: 10" across opening, 8" across base, 8" deep

Materials:
Patons Classic Merino Wool (100% Merino wool; 223 yds per 100g skein), That's Pink, 2 skeins
Lion Brand Fun Fur (100% Polyester; 60 yds per 50g skein), Raspberry, 1 skein, Soft Pink, 1 skein
Size US11 (8mm) 16" circular needle, or size required for gauge
Set of 5 stitch markers, one of which should be a different color to mark the start of the round.

Gauge:
12.25 sts/32 rows=4" in St St post-felting with two strands held together throughout (Pre-felting gauge is not critical, but mine was 11 sts/16 rows=4" - this is knit VERY loosely)

SSK = Slip, slip, knit
K2TOG = Knit 2 together
PM = Place marker

Bag:
Using 2 strands of Merino Wool, cast on 76 sts. Join to work in the round. NOTE: Follow desired stripe pattern while working below instructions.
Round 1: K9, PM, K20, PM, K18, PM, K20, PM, K9, PM for beginning of round.
Rounds 2-4: K all sts
Round 5 (decrease round): *K to 2 sts before marker, SSK, K to next marker, K2TOG* repeat from * to *, K to end of round (The decreases will all happen in the 18-stitch sections – the 20-stitch sections will stay at 20 sts) – 72 sts
Round 6-12: K all sts
Rounds 13-52 : Repeat rounds 5-12 5 more times – 52 sts remain (You will decrease on rounds 5, 13, 21, 29, 37, and 45)
Round 53: Repeat Round 5 – 48 sts remain
Rounds 54-57 : K all sts
Round 58: P all sts, removing 4 decrease markers (not beginning of round marker)
Round 59: *K2TOG, K 20, K2TOG* repeat from * to * - 44 sts remain
Arrange stitches onto 2 needles, and use 3-needle bind-off method to close bottom of purse.

Handles:
Usin 1 strand of Merino Wool, knit 4 24" pieces of 4-stitch i-cord (I used my Embellish-Knit cord maker). After felting, twist two cords together for each handle, and pin them down until they dry. Attach to inside top of purse.

To felt bag:
Put bag and handles into pillowcase or mesh laundry bag and run through wash cycle using hot water and lowest water level. You may need to add a pair or two of jeans for agitation. When the bag has reached the desired level of felting (Mine took 20 minutes), remove from the washer (do not let it spin). Squeeze out water using towels, and lay out to dry, pinning twisted handles as above.

Once the bag is dry, you may need to trim the Fun Fur on the inside, or it may fill the interior of the bag. Once it is felted, this is no problem – just give the bag a haircut close to the inner surface.


Striping Pattern Options:
As pictured above:
CO-round 7: 2 strands Merino Wool
Rounds 8-10: 1 strand Merino Wool, 1 strand Fun Fur in Raspberry
Rounds 11-23: 2 strands Merino Wool
Rounds 24-26: 1 strand Merino Wool, 1 strand Fun Fur in Soft Pink
Rounds 27-39: 2 strands Merino Wool
Rounds 40-42: 1 strand Merino Wool, 1 strand Fun Fur in Raspberry
Rounds 43 – end: 2 strands Merino Wool

Alternate version (more fur stripes):
CO-round 7: 2 strands Merino Wool
Rounds 8-10: 1 strand Merino Wool, 1 strand Fun Fur in Raspberry
Rounds 11-15: 2 strands Merino Wool
Rounds 16-18: 1 strand Merino Wool, 1 strand Fun Fur in Soft Pink
Rounds 19-23: 2 strands Merino Wool
Rounds 24-26: 1 strand Merino Wool, 1 strand Fun Fur in Raspberry
Rounds 27-31: 2 strands Merino Wool
Rounds 32-34: 1 strand Merino Wool, 1 strand Fun Fur in Soft Pink
Rounds 35-39: 2 strands Merino Wool
Rounds 40-42: 1 strand Merino Wool, 1 strand Fun Fur in Raspberry
Rounds 43-47: 2 strands Merino Wool
Rounds 48-50: 1 strand Merino Wool, 1 strand Fun Fur in Soft Pink
Rounds 51 – end: 2 strands Merino Wool

ETA: Pattern now in sidebar in a printer-friendly .pdf format!

Labels:

Wednesday, October 12, 2005

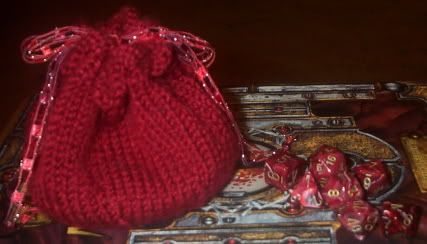
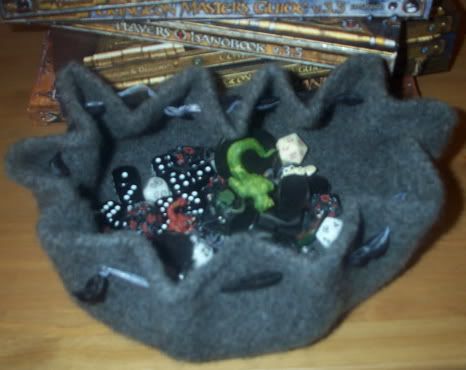
Geek Chic Dice Bags Pattern

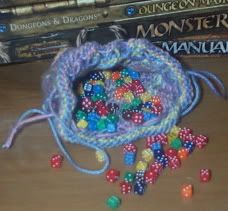
Geek Chic Dice Pouch

Since hubby is a hard-core D&D geek, he has lots of dice. I decided that he needed a nifty bag to keep them in, so I made the red version. Then I decided I wanted it for my dice, and made the felted version for him. The smallest one was made for a set of 100 tiny 6-sided dice (4mm on a side) These would also work well in non-geek applications, and are great stashbusters – I didn’t use anywhere near a full skein for any of them. Gauge is not critical, but I have given mine as a reference.

Sizes: S, M, L (L is felted version)
Finished Measurements(across opening): 3”, 5”, 8”
Materials:
Small bag: Red Heart Luster Sheen (100% Acrylic; 335yds per 113g skein), color: Serenity, 28sts=4”
US size 2 dpns (set of 4) 3 stitch markers, yarn needle, approx. 1 yard scrap yarn or ribbon for drawstring.
Medium bag: TLC Lustre (100% Acrylic; 253yds per 143g skein), color: Claret, 18sts=4”
US size 5 dpns (set of 5) 4 stitch markers, yarn needle, approx. 1 yard scrap yarn or ribbon for drawstring.
Large bag: Patons Classic Merino Wool (100% Merino wool; 223yds per 100g skein), 16sts=4” post-felting
US size 10 dpns (set of 5) 12 stitch markers, yarn needle, approx. 2 yards scrap yarn or ribbon for drawstring, plus approx 18” scrap non-felting yarn

SKP = Slip 1, knit 1, pass slipped stitch over

Small bag:
CO 60 sts, divide evenly onto 3 needles. Join to beginning of round, being careful not to twist the work.
Rnds 1-4: K all sts
Rnd 5 (eyelet rnd): *K1, yo, SKP, K1* Repeat from * to * around.
Rnd 6: *K10, pm, K10* Repeat from * to * around (1 marker in center of each needle)
Rnd 7-18: K all sts
Rnd 19 (decreases): *K to 2 sts before marker, SKP, K to 2 sts before end of needle, SKP*. Repeat from * to * around (54 sts, 18 per needle)
Rnds 20-21: K all sts
Rnd 22: Repeat as for Rnd 19 (48 sts, 16 per needle)
Rnds 23-24: K all sts
Rnd 25: Repeat as for Rnd 19 (42 sts, 14 per needle)
Rnd 26: K all sts
Rnd 27-30: Repeat as for Rnd 25 and 26 (ending with 30 sts, 10 per needle)
Rnd 31 (ridge for bottom of bag): P all sts
Rnd 32-35: Repeat as for Rnd 19 (ending with 6 sts, 2 per needle). Remove markers after Rnd 35.
Rnd 36: SKP around – 3 sts. Break yarn and thread through remaining stitches. Pull tight, pulling end of yarn to inside of bag. Weave in ends.
Cut 2 pieces of yarn (or ribbon) 12” long. Thread through eyelets in top of bag so that the ends of the two pieces are on opposite sides of the bag. Knot ends of each piece of yarn together.

Medium Bag:

CO 80 sts, divide evenly onto 4 needles. Join to beginning of round, being careful not to twist the work.
Rnds 1-4: K all sts
Rnd 5 (eyelet rnd): *K1, yo, SKP, K1* Repeat from * to * around.
Rnd 6: *K10, pm, K10* Repeat from * to * around (1 marker in center of each needle)
Rnd 7-18: K all sts
Rnd 19 (decreases): *K to 2 sts before marker, SKP, K to 2 sts before end of needle, SKP*. Repeat from * to * around (72 sts, 18 per needle)
Rnds 20-21: K all sts
Rnd 22: Repeat as for Rnd 19 (64 sts, 16 per needle)
Rnds 23-24: K all sts
Rnd 25: Repeat as for Rnd 19 (56 sts, 14 per needle)
Rnd 26: K all sts
Rnd 27-30: Repeat as for Rnd 25 and 26 (ending with 40 sts, 10 per needle)
Rnd 31 (ridge for bottom of bag): P all sts
Rnd 32-35: Repeat as for Rnd 19 (ending with 8 sts, 2 per needle). Remove markers after Rnd 35.
Rnd 36: SKP around – 4 sts. Break yarn and thread through remaining stitches. Pull tight, pulling end of yarn to inside of bag. Weave in ends.
Cut 2 pieces of yarn (or ribbon) 18” long. Thread through eyelets in top of bag so that the ends of the two pieces are on opposite sides of the bag. Knot ends of each piece of yarn together.

Large (Felted) Bag:

CO 160 sts, divide evenly onto 4 needles. Join to beginning of round, being careful not to twist the work.
Rnds 1-8: K all sts
Rnd 9: (eyelet rnd): *K1, yo, SKP, K7* Repeat from * to * around.
Rnd 10: *(K10, pm) 3 times, K10 * Repeat from * to * around (3 markers on each needle)
Rnd 11-33: K all sts
Rnd 34 (decreases): *(K to 2 sts before marker, SKP) 3 times, K to 2 sts before end of needle, SKP*. Repeat from * to * around (144 sts, 36 per needle)
Rnds 35-36: K all sts
Rnd 37: Repeat as for Rnd 34 (128 sts, 32 per needle)
38-39: K all sts
Rnd 40: Repeat as for Rnd 34 (112 sts, 28 per needle)
Rnd 41: K all sts
Rnd 42-45: Repeat as for Rnd 40 and 41 (ending with 80 sts, 20 per needle)
Rnd 46-49: Repeat as for Rnd 34 (ending with 16 sts, 4 per needle). Remove markers as needed.
Rnd 50: SKP around – 8 sts.
Rnd 51: SKP around – 4 sts.
Break yarn and thread through remaining stitches. Pull tight, pulling end of yarn to inside of bag. Weave in ends.
To felt bag: thread scrap non-felting yarn through eyelets and knot together (This keeps the eyelets from felting closed. (Ask me how I know to do that) Put bag into pillowcase and run through wash cycle using hot water and lowest water level. You may need to add a pair or two of jeans for agitation. When the bag has reached the desired level of felting, remove from the washer (do not let it spin). Squeeze out water using towels, remove scrap yarn, and stretch bag over appropriate shaped item to dry (an upside-down mixing bowl works well for this).
When bag is dry, cut 2 pieces of yarn (or ribbon) 18-24” long. Thread through eyelets in top of bag so that the ends of the two pieces are on opposite sides of the bag. Knot ends of each piece of yarn together.

ETA: Pattern now in sidebar in a printer-friendly .pdf format!

Labels:

Red "Shopping Spree" Poncho Pattern

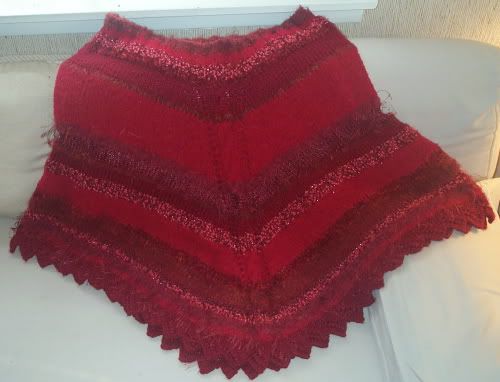
Shopping Spree Poncho

So named because hubby and I ran around the yarn section of AC Moore grabbing every red yarn we liked until we found a combination that seemed perfect.(Adapted from Melanie Scoles’ “That Seventies Poncho” in Debbie Stoller’s Stitch ‘n Bitch Nation. Lace edging pattern from “Tricia’s Shawl” in Sally Melville’s The Knitting Experience Book 2:The Purl Stitch) The poncho begins at the neck, with increases on either side of the cable panels every other row. The turtleneck is picked up and added on afterward.

One Size
Finished Measurements: 27” long at center neck (including turtleneck and edging), 96” around bottom
Gauge: Because of the varied yarns, gauge will change from section to section, but I averaged about 14 sts/4”. If you do use different yarns than I did, the best way to avoid gauge problems is not to do too many consecutive rounds of any yarns that are much thicker or much thinner than the rest. To substitute yarns, make sure you have about 1200 yards total.
Materials:
A - TLC Amore (80% Acrylic, 20% Nylon; 290 yds per 170g skein), color: Red Velvet, 1 skein
B - TLC Lustre (100% Acrylic; 253 yds per 143g skein), color: Claret, 1 skein
C - Bernat Ping Pong (73% Acrylic, 27% Nylon; 58 yds per 50g skein), Color: Radiant Red, 2 skeins
D - Katia Grenada (64% Polyamide, 36% Polyester; 140 yds per 50g ball), Color: 11 – Dark Red, 1 ball (Note: This seems to be a discontinued yarn. It is a narrow (1mm) ribbon yarn and any narrow ribbon should work as a substitute)
E - Moda Dea Prima (60% Nylon, 40% Polyester; 77 yds per 50g skein), color: Burgundy, 1 skein
F - Caron Jewel Box (64% Acrylic, 20% Rayon, 16% Polyester; 100 yds per 71 g skein), color: Ruby, 1 skein
G - Lion Brand Color Waves (73 % Acrylic, 27% Polyester; 125 yds per 85 g skein), color: Sunset Red, 1 skein
H - Bernat Solo (72% Acrylic, 28% Polyester; 86 yds per 80g skein), color: Tomato, 1 skein
US Size 10 circular needle (interchangeable, or in 16”, 24”, and 36” lengths)
Cable needle
5 stitch markers, 1 of which is different to mark the beginning of the round.

I pretty much changed yarns whenever the mood struck me, but here is the color sequence as I worked it:
Body (top-down):
10 rows B, 2 rows H, 18 rows A, 2 rows E, 8 rows D, 2 rows G, 6 rows B, 6 rows C, 10 rows A, 6 rows F, 4 rows H, 3 rows G, 3 rows D, 4 rows C, 6 rows E
Turtleneck (bottom-up):
4 rows F, 4 rows C, 4 rows A, 4 rows G

pm = place marker
sm = slip marker

Poncho body:
Using color B and shortest needle, cast on 136 sts. Join, placing marker to indicate beginning of round.
Round 1: K48, pm, K10, pm, K58, pm, K10, pm, k10 (This puts the beginning of the round away from the front and back cable panels so that the color changes are not in the panels)
Round 2: *K to marker, yo, sm, p2, k6, p2, sm, yo*, repeat from * to *, k to end of round.
Round 3, 5, and 7: *K to marker, sm, p2, k6, p2, sm *, repeat from * to *, k to end of round.
Round 4: *K to marker, yo, p2, sl3 to cable needle, hold in front, k3, k3 from cable needle, p2, yo*, repeat from * to *, k to end of round.
Round 6: repeat row 2
Rounds 8-90: Repeat rows 2 through 7, changing colors as indicated above, 14 more times. Switch to longer needles as needed. Begin lace edging.

Lace Edging (worked flat in color B):
Set up row: With RS facing, cast on 6 stitches onto left needle.
Row 1 (RS): K5 , sl 1 (from poncho), psso (joins lace to poncho).
Row 2 (WS): K2, yo, k2tog, yo, k2 (7 sts)
Row 3: K6, sl1, k1 (from poncho), psso.
Row 4: K3, yo, k2tog, yo, k2. (8 sts)
Row 5: K7, sl1, k1 (from poncho), psso.
Row 6: K4, yo, k2tog, yo, k2 (9 sts)
Row 7: K8, sl1, k1 (from poncho), psso.
Row 8: K5, yo, k2tog, yo, k2 (10 sts)
Row 9: K9, sl1, k1 (from poncho), psso.
Row 10: K6, yo, k2tog, yo, k2 (11 sts)
Row 11: K10, sl1, k1 (from poncho), psso.
Row 12: K7, yo, k2tog, yo, k2 (12 sts)
Row 13: (RS) Bind off 6 at beginning of row (1 stitch left on right-hand needle), K4 (5 sts on right-hand needle), sl1, k1 (from poncho), psso.
Rows 2-13 repeat around bottom of poncho. It will look wonky where they meet back up, but fudge it as best you can. No one will notice.

Turtleneck:
Pick up 108sts around cast-on edge. Work 16 rows of K2, P2 ribbing, following color sequence. Bind off loosely in pattern. Weave in all ends.

ETA: Pattern now in sidebar in a printer-friendly .pdf format!

Labels:

Knitting Patterns

So, I got a very sweet message from merrymom today, asking about the pattern for my red poncho. I adapted it from "That Seventies Poncho" in Stitch 'n Bitch Nation, adding the cables and the edging and the turtleneck. So, I have written it up, as well as the one for the dice bags I made for Kris and I, and as soon as I can figure out someplace to host them online, I will post the patterns for them.

Seeing as it is almost 1 AM and I have been playing with writing up those patterns since dinner, I should probably go to bed and re-read them in the morning before I put them out there for anyone else to see. At this point, they could be gibberish. =)

ETA:Ok, based on some advice I found on the Knittyboards, I have decided to put my patterns here as blog posts rather than finding somewhere to host the files, since GeoCities is being annoying. Links will be in the sidebar as soon as I get them done.

Labels:

Sunday, August 21, 2005

Jayne Hat pattern

There has been some discussion of the Jayne hats on the Knittyboards of late, so I figured I'd post the pattern I worked out for the hats I made for Kris and Ed.

Jayne Hat

Cascade 220, doubled throughout – 1 skein each in colors 7825 (orange), 9404 (yellow), and 9444 (red) – makes 2 hats

Gauge - 11 sts/4” on
Size 11 circulars and dpn's

Hat -
CO 52 sts in orange yarn, join and work in K1, P1 ribbing for 3 rounds.
Work 15 rounds stockinette in orange.
Switch to yellow, and work 8 more rounds in stockinette.
Yellow round 9 – *K11, ssk* repeat from * to * around (switch to DPN’s when needed when decreasing)
Yellow round 10 (and all even rounds) – K all sts
Yellow round 11 – *K10, ssk* repeat from * to * around
Yellow round 13 – *K9, ssk* repeat from * to * around
Yellow round 15 – *K8, ssk* repeat from * to * around
Yellow round 17 – *K7, ssk* repeat from * to * around
Cut a long tail and thread it onto a yarn needle. Draw the tail through the remaining 32 sts and pull tight.

Flaps -
Pick up 15 sts on the bottom edge of the hat, using the red yarn.
Work in stockinette stitch for 12 more rows, finishing with a WS row.
Row 13: K1, ssk, k to last 3 sts, K2tog, K1
Row 14: Purl all sts
Repeat rows 13 and 14 until 7 sts remain, ending with a RS row
To bind off – P1, *slip back to left needle, P2Tog.* Repeat from * to * until last stitch. Cut a long tail and pull through final stitch. Weave yarn back so that it comes out at the center bottom of the flap, and leave a tail for tying the flaps together.
Repeat for second flap, making sure that the flaps are centered opposite one another.

Using all three yarns, make a pompom for the top of the hat.

ETA: Pattern now in sidebar in a printer-friendly .pdf format!

Labels: